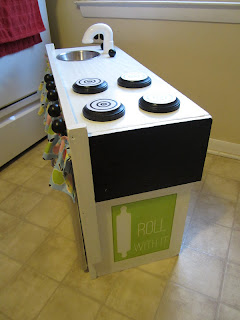
Do you remember this post?? Well I'm happy to report that my play kitchen is finished!!!! To begin, I found this unit for $20 at the Habitat for Humanity ReStore. I thought it was the perfect height for Elise and I loved all of the available space on top!
Here it is!! I have to admit, I'm pretty dang proud of myself for how this turned out!! Below I have some other pictures so you can see all the little details better! I hope you all understand that the black cupboard is supposed to be the oven door! If you forgot, here is what it looked like when I started:
It looks like a ton of work, but really it wasn't that bad. The worst part for me was sanding and waiting for the coats of paint to dry. Some of them took up to 24 hours to dry and when you are doing 2 coats time drags on!
For the sink, I found the bowl for the sink at Goodwill for $1.99 and faucet is a p-trap in the plumbing department for about $2.50! I love how it looks! My father-in-law was in town a few weeks ago and I had him help me use the jigsaw to cut the holes for the sink and drill holes for all my knobs. And yes, all of the knobs really turn!
The stove burners are just wooden plaques that I found at Michaels. I also found the knobs for the sink and oven/stove there too. I painted them all black. To get the look on top of the burners I google imaged "concentric circles" and found this picture. I cut it out and glued it on!
I was able to find these adorable kitchen printables via Pinterest or you can also find them here. What made it even better is that they were free!
The black paint you see above the printable is actually chalk board paint! That way she can color and draw her menu on the sides :) I don't have any chalk yet so I'll have to show that later!
I found the fabric for my curtain at JoAnn. I'm also planning to make a chef's hat and apron to go with it!! I got all of the paint and other supplies (like the pulls on the cupboards) at Lowes for a very cheap cost! I'd say the entire project cost less than $55. The most expensive part was the unit itself and all of the piant! I had to buy primer, paint AND a polyurethan sealer!!
If there is something I didn't mention thatyou were wondering about, let me know! This was such a fun project, I'd be happy to help if anyone has a question. Thanks to blogs and pinterest I was able to get this done and get lots of ideas and inspiration!!


9 comments:
it turned out so great. and, just so you know, i knew it was the oven before you even mentioned. so cute.
I knew it was the oven too, I'm smart like that. :)
LOVE LOVE LOVE it. I'm going to have to put Clare on "watch" and see what we can find, I think "Santa" may bring one to Emery next year. I'm sure I'll have questions when I actually get started but that gives me a GREAT start!!!! THANK YOU.
It looks so so cute! What a lucky girl Elise is. Nice work, Emily!
Wow.
I told you... seriously best mom ever! ;) Love it Emily! It turned out so cute, so dang impressed!!! :)
So so cute!
It turned out so great! I love how when you start a project, you get it done really quickly. I don't know how you do that with Elise around, but I admire you for it!
It turned out so adorable!! Very, very nicely done! I love all of the little touches you added! The chalkboard paint, the printables, all so cute!! If only I knew someone handy!!
I am beyond impressed and amazed! Seriously--I am not that talented! Way to go Sis! And seriously--could Elise get any cuter? I think not! Miss you!
Post a Comment